Headlight restoration is the process of removing oxidation, yellowing, and surface damage from plastic headlight lenses to restore clarity and light output. It involves controlled sanding, polishing, and applying UV protection to slow future deterioration. Proper restoration improves nighttime visibility, safety, and the overall appearance of the vehicle.
It usually happens quietly. You’re driving at night and thinking, “Why does everything look so dim?” The headlights are on, but the road still feels darker than it should. Then you wash your car and there it is, cloudy, yellowed headlights staring back at you. Thats when you know that its time to restore headlights.
Modern headlights are made from plastic, not glass, and sunlight slowly breaks them down. It doesn’t happen overnight, which is why most people don’t notice until visibility starts suffering. A quick wipe might make them look better for a day or two, but restoration actually fixes the issue. This guide is for anyone who wants safer night driving, clearer headlights, and a car that looks cared for again.
What Does It Mean to Restore Headlights?
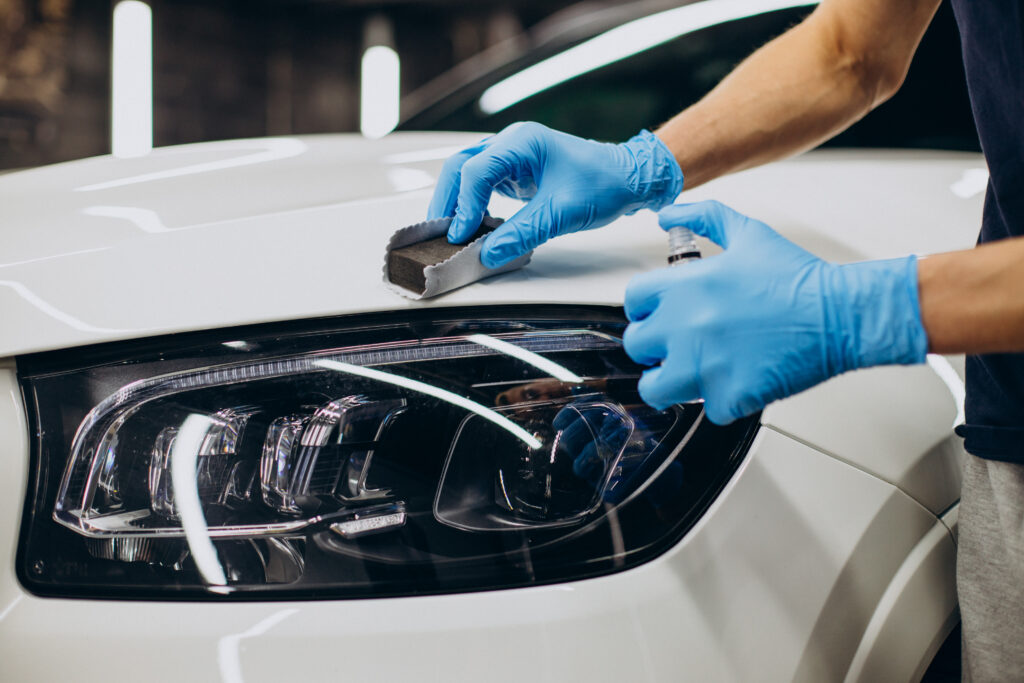
Headlight restoration means repairing cloudy, yellowed, or dull headlights so they return to clear, fully functional condition. Modern headlights are made from polycarbonate plastic, which is strong but highly sensitive to environmental damage. Over time, UV exposure breaks down the factory protective coating, causing oxidation. This results in haze, discoloration, and reduced light output. Once oxidation sets in, regular cleaning is ineffective. Restoration works by correcting and refinishing the damaged surface, not just temporarily improving the appearance.
- UV damage from constant sun exposure, which breaks down the protective layer
- Road debris and sand, which slowly scratch and wear the surface while driving
- Harsh chemicals from automatic car washes, degreasers, and improper cleaners
- Heat from the headlights, which accelerates surface deterioration over time
Modern headlights degrade faster because polycarbonate plastic is not naturally UV-stable. Manufacturers apply a thin UV coating at the factory, but as the vehicle ages, that coating wears away. Once it fails, oxidation progresses quickly.
Headlight restoration removes this damaged outer layer, refines the surface, and adds new protection. Without restoring headlights, oxidation continues to worsen, eventually affecting nighttime visibility, safety, and the overall appearance of the vehicle.
What Headlight Restoration Actually Does
Headlight restoration is not a surface-level fix or a cosmetic shine — it is a corrective process that addresses physical damage on the headlight lens. Over time, oxidation and UV exposure create a deteriorated outer layer that blocks light and reduces clarity. A proper headlight restore removes that damaged layer and rebuilds the surface.
During professional or properly done DIY headlight restoration, several key steps take place:
- Removal of the oxidized outer layer that causes yellowing, haze, and dullness
- Leveling and refining the lens surface through controlled sanding to eliminate surface defects
- Polishing the lens to restore optical clarity so light passes through cleanly
- Sealing or protecting the lens with a UV-resistant coating to slow future oxidation
Headlight restoration is effective because it removes the damaged plastic instead of masking it. Properly done and sealed, it restores clarity, improves light output and nighttime visibility, enhances appearance, and extends headlight lifespan, delaying costly replacement.
What Headlight Restoration Does Not Do
Headlight restoration works extremely well, but let’s be clear, it’s not magic. It can restore cloudy headlights, but it can’t undo every type of damage a vehicle may have accumulated over the years. Understanding what restoring headlights does not do helps set realistic expectations.
Here’s what headlight restoration does not do:
It does not fix cracks or internal moisture
If a headlight lens is cracked or has moisture trapped inside, restoration will not solve it. Fog or condensation inside the housing means the seal has failed. Sanding and polishing the outside won’t remove water trapped inside.
It does not repair broken or damaged housings
Loose headlights, broken mounting tabs, or housings held together with zip ties are structural issues. A headlight restore improves the lens surface only, not the assembly itself. In these cases, replacement is the only proper solution.
It does not last permanently without protection
Restoration removes the damaged surface, revealing clear plastic underneath. Without UV protection, oxidation returns quickly. Like a haircut, results fade without care. Proper UV sealing preserves clarity when damage is surface-level.
What Supplies Are Needed for Headlight Restoration?
If you’re still reading, chances are you agree that headlight restoration beats replacement hands down. Great, now let’s talk about what actually goes into doing it right. Below is a clear breakdown of the supplies you’ll need to restore headlights properly, from basic essentials to professional-grade tools.
Basic supplies
Prepare the lens and protect the surrounding areas before any abrasive or polishing work begins.
- Car wash soap
Removes road film, oils, and contaminants. If you sand over residue, those particles gouge the lens instead of removing oxidation cleanly. - Microfiber towels
Use lint‑free towels for drying, wiping away sanding residue, and cleaning off polish. Cheaper towels can leave fibers or swirl marks on the plastic. - Masking tape
Protects paint, trim, and rubber around the headlight. Proper masking keeps the correction confined to the lens and prevents accidental sanding of the bodywork.
These three are non‑negotiable, even if you’re using a full professional headlight restoration kit.
Abrasives the core materials
Abrasives are the workhorse of any real restoration. You need correct headlight restoration sandpaper grit progression and the right support pads to control pressure.
- Sandpaper grits
Common progression used by at luxe wheels auto detailing are :- ~800–1000 grit: initial oxidation removal or heavier damage
- ~1500–2000 grit: scratch refinement
- ~3000 grit: final smoothing before polishing
- Using this progression ensures each step removes the scratches from the previous step rather than leaving deeper marks that sabotage clarity later.
- Sanding pads or discs
Needed for even pressure, especially when using a machine or block. Pads prevent finger or edge marks that show up after polishing. - Wet sanding vs dry sanding differences
We prefer Wet sanding because it lowers heat, reduces gouging risk, and yields a uniform surface. Dry sanding encourages heat and uneven cuts, which is why many kits and pros avoid it on polycarbonate lenses.
Why this matters: abrasive choice is the difference between a long‑lasting result and a hazy surface that returns after a few weeks.
Polishing supplies
After sanding, polishing removes the final micro‑scratches and restores optical transparency.
- Plastic polish or compound
Use products specifically formulated for headlights or plastics. Ordinary paint polish won’t always clear the fine, sanding‑induced haze on polycarbonate lenses. - Dual‑action or rotary polisher (optional)
A machine gives faster, more uniform correction than hand work. It’s optional but strongly recommended when the lens is heavily oxidized or when consistency matters.
- Foam or microfiber pads
Foam pads are common for compounding; microfiber pads can increase cutting power on tougher haze. Matching pad type to the polish or compound maximizes clarity with less effort.
Many headlight restoration product bundle sanding and polishing steps; others leave polishing to a separate, premium compound. Either way, expect at least one polishing pass after the final grit.
Protection & sealing
Now this is the part that makes the restoration last. Without it, oxidation returns quickly.
- UV sealant
A short‑ to medium‑term barrier against UV damage. Often included in consumer and professional kits. A good headlight restorer sealant slows re‑oxidation for months. - Ceramic coating for headlights
Provides stronger, longer‑lasting UV resistance than many basic sealants. Ideal when you want the result to hold up through seasons of sun exposure. - Clear coat spray (professional option)
A more durable, professional‑grade solution applied by trained detailers. It can offer the longest protection but demands precise prep and curing.
Think of protection as the final stage of every headlight restoration process; without it, the labor of sanding and polishing is wasted.
Optional / professional tools
Tools that some detailing service provider like us add for speed, control, or specialized work. Useful, not strictly required, but common in advanced kits.
- Drill‑mounted restoration kits
Combine sanding, backing plates, and sometimes polish pads for powered correction. They can be faster but require discipline on grit progression and pressure to avoid over‑cutting. - Steam headlight restoration tools
Use vapor or specialized chemistry to reflow or soften the surface. Potentially effective but easy to misuse; experience matters. - Heat guns (use with caution)
Can temporarily improve clarity or help with coatings, but risk warping the lens if overheated. Only for experienced users.
Examples of real kits and products that fit these needs
Below are three solid, widely available kits you can actually buy today useful examples when equipping a shop or a DIYer’s garage. They illustrate how the supplies above come bundled in professional headlight restoration kits or trusted consumer kits.
1) A highly regarded consumer kit with real UV protection
Meguiar’s Ultimate Headlight Restoration Kit
What it gives you
- Two sanding grades (1000 and 3000 grit) for controlled abrasive progression. The kit explicitly uses these to remove yellowing and cloudiness.
- A UV‑protective sealant included for long‑lasting protection Meguiar’s claims up to 18+ months of protection when applied correctly.
- No power tool required, yet enough technical control to handle mild to heavy oxidation.
Home DIY or light‑duty professional jobs; good balance of completeness, cost, and outcomes.
2) A proven kit from an OEM‑lighting leader with strong warranty language
SYLVANIA Headlight Restoration Kit
What it gives you
- A three‑step system: surface activation, sand & polish, then finish and seal with UV block clear coat tidily aligning with pro process steps.
- Lifetime limited warranty for the kit’s components for the original owner, and coverage for two headlight assemblies when used properly. Useful assurance for DIYers.
- A kit aimed at both clarity restoration and durable protection, reinforcing that sealant step is mandatory, not optional.
DIYers who want a structured process and strong protection, plus an element of warranty support.
3) A widely available, practical kit that leans toward pro‑style abrasives
3M Ultra Headlight Lens Restoration Kit 39195
What it gives you
- A kit with sanding discs, UV clear coat protectant, masking tape, and backing components typical of more technical 3m headlight restoration kit. 3M’s own documentation highlights the inclusion of abrasives, tape, and protectants for plastic lenses.
- Uses 3M’s precise abrasive systems and includes protecting wax or clear coat to save cost versus full replacement an economical approach when shop time or budget is limited.
- Practical for heavier oxidation or when you want to replicate a professional process without buying high‑priced equipment.
Budget-minded DIY users or small shops needing a capable kit with real sanding and UV sealing, especially when cost and availability matter.
Quick guidance on choosing among these
- If you want the simplest, low‑cost kit with real UV protection: start with Meguiars headlight restoration kit or Sylvania. Both are structured, include protection, and are easy to use.
- If heavy oxidation or more control is your priority: 3M’s kit gives a more tool‑oriented, abrasive‑heavy workflow that experienced users can leverage effectively.
- If moving toward professional work: have wet sanding supplies, correct pads, and a UV or ceramic coating ready beyond any kit these are the items that ensure longevity and true professional results.
Using the correct headlight restoration polish, sandpaper grits, sealants, and tools as shown above ensures the process is not only technical but actually successful on real vehicles.
Step-by-Step Headlight Restoration Process
This is the part of the job where results are made or ruined. Every step here has a purpose. Skip one, rush one, or improvise the wrong way, and you either don’t remove the damage… or you remove more plastic than you should.
Step 1: Wash and Prep
Before sandpaper ever touches the lens, the headlight has to be completely clean.
Thorough cleaning
- Use a pH-neutral car wash soap and clean water.
- Wash the headlight as if it were part of the paint:
- Foam or soak the area
- Gently agitate with a soft wash mitt or sponge
- Rinse thoroughly
You’re not just removing visible dirt you’re getting rid of invisible film that will interfere with sanding and polishing.
Removing road film and contaminants
Even after a basic wash, headlights often have:
- Traffic film
- Bug residue
- Light tar or grease
- Mineral deposits
If needed:
- Use a dedicated bug/tar remover or APC (all-purpose cleaner) diluted correctly.
- For stubborn spots, lightly use a clay bar or synthetic clay mitt to pull off bonded contaminants.
If contaminants stay on the lens, the sandpaper drags them across the surface and cuts deeper, uncontrolled scratches.
Drying before sanding
- Dry with a clean microfiber towel.
- Make sure water isn’t hiding in gaps around the lens.
- If you’re going to wet-sand, you still start from a clean, dry surface and then add clean water as lubricant never sand over dirty water or residue.
Dry, clean plastic lets you see the true condition and oxidation level before you begin.
Step 2: Mask Surrounding Areas
Sanding without masking is how people accidentally “detail” their paint in the worst way.
Protecting paint, trim, and rubber
- Use quality automotive masking tape (not brittle hardware-store tape).
- Apply tape along:
- The top edge where the headlight meets the hood
- The sides where it meets fenders or bumper
- Any rubber weather seals around the lens
In some cases, two layers of tape are smart especially if you’re using lower grits (e.g., 600–800) for heavy oxidation.
Importance of clean edges
Proper masking:
- Allows you to sand confidently right up to the edge of the lens
- Prevents accidental sanding of clear coat on the body
- Gives a crisp transition line, so the restoration looks intentional, not “I got tired and stopped here”
If you’re afraid to sand near the edges, you end up with clear centers and hazy perimeters very obvious in sunlight and at night.
Step 3: Initial Sanding (Oxidation Removal)
This is where the real work starts. The goal here is simple: remove the entire oxidized layer.
Choosing correct grit based on damage
You don’t start at the same grit for every car.
- Light–moderate haze:
- 1000–1500 grit can be enough to cut through the oxidation.
- 1000–1500 grit can be enough to cut through the oxidation.
- Heavy yellowing / deep oxidation / pitting:
- 600–800 grit is usually needed to break through the damaged layer.
Rule of thumb:
- Start as fine as you can while still cutting effectively.
- If the oxidation isn’t disappearing, step down to a lower grit.
Wet sanding technique
- Use clean water with a bit of car soap or a dedicated sanding lubricant.
- Keep the surface wet at all times don’t let the pad drag dry.
- Work small sections, maintaining:
- Light to medium, even pressure
- Flat pad contact (no digging in edges)
- Light to medium, even pressure
You’ll see the water turning milky/creamy that’s oxidized plastic and coating being removed, which is exactly what you want.
Cross-hatch sanding pattern
To avoid grooves and uneven cutting:
- Sand in one direction (e.g., horizontal passes) for a few passes.
- Then switch 90° (vertical passes) for the next passes.
This cross-hatch pattern:
- Levels the surface more evenly
- Makes it easier to see when previous sanding marks have been removed in later steps
Visual indicators of oxidation removal
You know the initial sanding is doing its job when:
- Yellow tint disappears and is replaced by uniform dullness
- Gloss is completely gone (it should look evenly frosted)
- No shiny “islands” remain those are uncut, still-oxidized spots
If you still see cloudy yellow or patchy gloss, keep going at this step. Moving on too early = permanent haze later.
Step 4: Progressive Sanding
Now you’re not fighting oxidation you’re fighting your own sanding marks.
Moving through finer grits
Typical progression after initial cut:
- From 600/800 → 1000 or 1500 grit
- From 1000/1500 → 2000 grit
- Finally → 2500–3000 grit
Each grit’s job:
- Remove the scratches from the previous grit
- Leave shallower, finer scratches behind
You’re not trying to “save time” here this is where clarity is built.
Removing previous sanding marks
At each step:
- Sand until the deeper scratches from the previous grit disappear.
- Use the same cross-hatch pattern and good lubrication.
- Wipe, inspect, and only move up when:
- The surface has a uniform scratch pattern
- No “ghost lines” from coarser grits remain
If you rush, you’ll be trying to fix 800-grit scratches with polish not happening.
Achieving uniform clarity
After the final grit (often 3000):
- The lens should still look matte, but much smoother and more consistent.
- Under light, the “haze” should be very fine, not rough or patchy.
A well-sanded lens at 3000 grit will polish up quickly and cleanly. A poorly sanded lens will fight you the entire polishing stage.
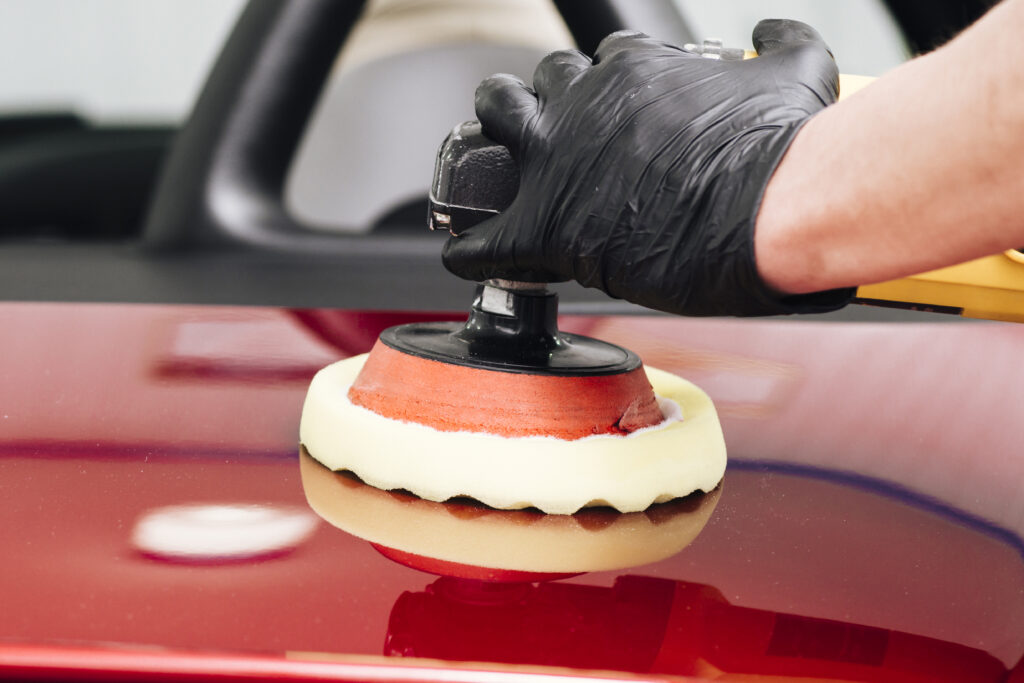
Step 5: Polishing the Headlights
Now you turn “smooth but dull” into “clear and bright.”
Applying plastic polish or compound
- Use a headlight-safe compound or plastic polish not a super aggressive wool/rotary combo meant for paint correction.
- Apply a small amount to the pad (don’t overload).
- Work the product in:
- Medium pressure
- Moderate speed
- Overlapping passes
- Medium pressure
The goal: remove the fine sanding marks, not burn the plastic.
Machine vs hand polishing
- Machine polishing (dual-action or rotary)
- Faster, more consistent
- Better at fully removing 2000–3000 grit marks
- Preferred in any professional environment
- Faster, more consistent
- Hand polishing
- Possible for light oxidation and finer sanding finishes
- Much slower, more effort, and more likely to leave micro haze
- Possible for light oxidation and finer sanding finishes
If you’ve sanded correctly up to 3000 grit, a DA polisher with a light cutting or polishing pad will usually bring the lens to near-factory clarity.
Restoring transparency and shine
You’ll know the polishing stage is doing its job when:
- The lens transitions from dull/matte to clear and glossy
- You can see the reflector and bulb housing sharply again
- The “fogginess” disappears not just looks shiny from oils
If you still see uniform haze after a few passes, either:
- Sanding marks from too low a grit are still present
- You need an additional compound pass before finishing polish
Step 6: Final Cleaning
Polish residue left on the lens can interfere with protection and hide mistakes. You don’t want either.
Removing polish residue
- Wipe the lens with a clean microfiber towel.
- Use a dedicated panel wipe / isopropyl alcohol mix (properly diluted) to:
- Remove oils from polish
- Reveal the true finish
- Remove oils from polish
This step strips away fillers so you can see if the plastic is truly corrected or just temporarily glossed.
Inspecting for missed spots
Under good lighting (sunlight or a bright LED):
- Look for:
- Edge haze
- Small patches where oxidation remains
- Straight-line sanding marks that didn’t get refined
- Edge haze
If something looks off:
- Go back one step (e.g., quick 3000 grit + repolish) rather than ignoring it.
- It’s much easier to fix now than after coating or clear coat is applied.
Step 7: Applying UV Protection
This is the step that decides whether your work lasts months… or years.
Why this step is critical
When you sand and polish, you remove the original factory UV coating. That means:
- The plastic is now exposed
- It will start oxidizing again as soon as it sees UV light
- Without protection, the lens can look bad again in a matter of months
Protection is not optional it’s part of the restoration.
Sealant vs ceramic vs clear coat
You generally have three tiers:
- UV Sealant
- Easy to apply
- Often included in consumer kits
- Good for short-/medium-term (several months to a year, depending on conditions)
- Easy to apply
- Ceramic Coating for Headlights
- Stronger UV and chemical resistance
- Lasts longer than most sealants (often 1–2 years with proper care)
- Requires proper surface prep and cure time
- Stronger UV and chemical resistance
- 2K Clear Coat (professional option)
- Most durable and closest to OEM-style UV coating
- Requires careful prep, dust control, and even application
- Longer cure time; mistakes are harder to correct
- Best left to experienced detailers or body shops
- Most durable and closest to OEM-style UV coating
Cure time and handling precautions
After applying protection:
- Follow the product’s cure instructions exactly:
- Some sealants need a few hours without moisture.
- Ceramics may require 12–24 hours before water contact.
- Clear coats can need days before full hardness.
- Advise:
- No washing during the initial cure period
- Avoid harsh chemicals or automatic washes
Good protection plus good aftercare is what turns a nice restoration into a long-lasting one.
Why Professional Headlight Restoration Is Better Than DIY
DIY headlight restoration offers short-term cosmetic improvement and works only for light oxidation. Professional restoration is a controlled, corrective process using proper sanding, polishing, and durable UV protection, delivering clearer headlights, longer-lasting results, and reduced risk of damage.
Professional Headlight Restoration vs DIY (Comparison Chart)
| Factor | DIY Headlight Restoration | Professional Headlight Restoration |
| Oxidation removal | Limited, often uneven | Fully removed with controlled sanding |
| Sanding control | Basic, fixed grit options | Custom grit selection based on damage |
| Surface refinement | Minimal | Multi-stage refinement for uniform clarity |
| Polishing quality | Hand or light machine work | Machine polishing with proper pads & compounds |
| UV protection | Basic sealant, short lifespan | Sealant, ceramic, or clear coat options |
| Longevity | Weeks to a few months | 1–4 years depending on protection |
| Risk of damage | High if technique is wrong | Low due to experience and proper tools |
| Time investment | 1–3 hours, trial-and-error | ~1 hour with consistent results |
| Overall result | Looks better temporarily | Near-factory clarity and performance |
When DIY Makes Sense (and When It Doesn’t)
DIY can make sense if:
- Oxidation is very light
- You want a temporary improvement
- You’re comfortable accepting short-term results
Professional restoration is the better choice if:
- Headlights are heavily yellowed or cloudy
- You want results that last
- Safety and inspection compliance matter
- You don’t want to risk permanent damage
Headlights are a safety component, not just a cosmetic part. When clarity, longevity, and performance matter, professional headlight restoration is not an upgrade it’s the correct approach.
How to Take Care of Headlights After Restoration
Headlight restoration doesn’t end when the lenses look clear again. What you do after the restoration plays a major role in how long the results last. Proper aftercare protects the newly restored surface, preserves clarity, and slows down future oxidation.
Immediate Aftercare
The first 24–48 hours after restoration are critical, especially if a sealant, ceramic coating, or clear coat has been applied.
- Avoid washing for 24–48 hours
Freshly applied protection needs time to cure and bond. Washing too soon especially with pressure washers can weaken or remove the protective layer before it fully sets. - Avoid harsh chemicals initially
Stay away from:- Degreasers
- Strong APCs
- Bug removers
- Automatic car washes
- These can strip or damage fresh protection and shorten the life of the restoration.
Treat the headlights gently during this period the protection is still settling in.
Long-Term Maintenance Tips
Once the initial cure period is over, consistent but gentle care keeps headlights clear longer.
- Regular washing
Wash headlights whenever you wash the car. Built-up dirt and road film accelerate oxidation if left on the lens. - Avoid abrasive cleaners
Never use:- Scouring pads
- Rough sponges
- Household cleaners
- Polishing compounds unless re-correcting
- Scouring pads
- These scratch the surface and wear down UV protection prematurely.
- Use UV-safe car shampoos
Stick to pH-neutral, automotive shampoos designed to be safe on coatings and plastics. These clean without stripping protection.
Protection Boosters
Think of boosters as “maintenance for your maintenance.”
- Reapplying sealants
If your headlights were protected with a UV sealant, reapply it every few months to maintain UV resistance. - Using ceramic sprays
Ceramic spray coatings can be applied periodically to add an extra layer of UV and chemical resistance, especially after washes. - Parking habits (sun exposure reduction)
Small habits make a big difference:- Park in the shade when possible
- Use a garage or car cover if available
- Avoid prolonged sun exposure during peak hours
Less UV exposure = slower oxidation.
How Much Does Headlight Restoration Cost?
One of the most common questions we hear is, “Is headlight restoration actually worth it?” The short answer is yes but the real value becomes clear when you understand how restoration costs compare to DIY kits and full headlight replacement. Let’s break it down properly.
DIY Headlight Restoration Cost Breakdown
DIY headlight restoration looks affordable at first glance, but the real cost goes beyond the price tag on the kit.
Most consumer DIY kits typically cost between $15 and $35. These headlight restorer kits usually include a few sanding discs, a small amount of headlight restoration polish, and a basic UV headlight restore wipes or sealant. While they can improve appearance temporarily, they are designed for convenience rather than precision.
If you don’t already have supplies, additional costs add up quickly:
- Microfiber towels, masking tape, soap, spray bottles: $10–$25
- Optional tools like a drill or machine polisher: $40–$150+
Time is another cost people underestimate. A careful DIY job usually takes 1–3 hours, especially for first-timers. Even then, results depend heavily on sanding technique and proper grit progression. Longevity is typically limited, often a few months to a year at best especially if the kit’s UV protection is weak.
DIY works best for light haze and short-term improvement, but it often needs to be repeated.
Professional Headlight Restoration Cost
Professional headlight restoration costs more upfront, but it delivers better clarity, consistency, and durability.
Across the U.S., most professional detail shops charge:
- $75–$150 for standard restoration with sanding, machine polishing, and UV sealant
- $150–$250+ for premium services that include ceramic protection or advanced coatings
At luxe wheels auto detailing, we offer tiered packages so customers can choose based on condition and goals:
- Basic Headlight Restore – starting at $49
Ideal for lightly dull headlights. Includes light sanding, polishing, UV sealant, and improved visibility. - Premium Headlight Correction – starting at $79
Designed for moderate oxidation. Includes multi-stage sanding, machine polishing, and ceramic UV protection to restore brightness and safety. - Elite Headlight Restoration – starting at $139
Our most comprehensive option. Includes full wet-sanding, high-gloss polishing, and a ceramic coating that provides up to one year of protection and near-new clarity.
Final pricing can vary based on:
- Vehicle type and headlight size
- Severity of oxidation or previous damage
- Protection method chosen (sealant vs ceramic vs advanced coatings)
Restoration vs Headlight Replacement Cost Comparison
Many drivers assume replacement is the only solution, but it’s usually the most expensive option.
- Aftermarket headlight replacement typically costs $100–$600 for a pair, plus labor.
- OEM headlight replacement can range from $400 to well over $2,000 for modern LED, HID, or adaptive headlights.
- Labor alone can add $75–$300, especially on vehicles that require bumper removal.
Professional headlight restoration restores clarity, improves safety, and enhances appearance at a fraction of replacement cost, provided the lens is intact. Headlight restorer kits are temporary, replacements are expensive, but professional restoration offers long-lasting results, better visibility, and strong value without replacing the entire headlight assembly.
FAQs
Typically 6–12 months with a standard UV sealant. Longevity depends on sun exposure, washing habits, and maintenance. Ceramic or clear-coat protection can extend results to 1–4 years.
Cerakote typically lasts 1–2 years. It provides stronger UV resistance than basic sealants when applied correctly and maintained properly.
Clean and mask the area, wet-sand with progressive grits (usually 1000→3000), polish to restore clarity, then apply a UV protectant. Results are temporary without strong UV protection.
Professional restoration usually takes 45–90 minutes. DIY jobs take 1–3 hours, depending on experience and oxidation level.
Wait 24–48 hours. This allows the UV sealant, ceramic coating, or clear coat to cure properly and last longer.
Final Takeaway
Headlight restoration delivers multiple benefits in one service: improved nighttime visibility, safer driving, and a noticeably newer-looking vehicle. Clear headlights allow light to project properly, reduce glare, and make road signs easier to see, while also enhancing your car’s overall appearance.
DIY options can work for light haze, but they’re usually temporary and depend heavily on technique. For long-lasting results, consistent clarity, and proper UV protection, professional restoration is the smarter choice.
If your headlights are cloudy or yellowed, schedule our headlight restoration inspection or book our professional headlight restorer today and restore both safety and confidence behind the wheel
Cloudy headlights reduce light output and compromise safety.
Get professional restoration with proper UV protection that lasts.
Get Your Headlights Restored Now